UITableView에서 allowMultipleSelectionDuringEditing을 사용하여 여러개의 행 처리하기
서론
iPhone의 기본 메일 앱을 사용하면 여러개의 메일을 한번에 삭제, 이동, 복사 하기 위해서 편집 버튼을 누르면 여러개의 항목을 선택할 수 있는 UITableViewCell이 나타나게 된다. iOS 5 하위 버전 SDK에서는 UITableView에 이러한 인터페이스를 제공하지 않아서 이와 같이 여러개의 행을 선택하기 위해서 프로그래밍으로 해야했지만 iOS 5에서는 다음과 같은 여러개의 행을 선택할 수 있는 API를 제공한다. UITableView의 allowsMultipleSelectionDuringEditing 라는 속성을 이용하면 된다.
테스트를 하기 위해서 간단히 UITableView를 이용한 프로젝트를 만들자.
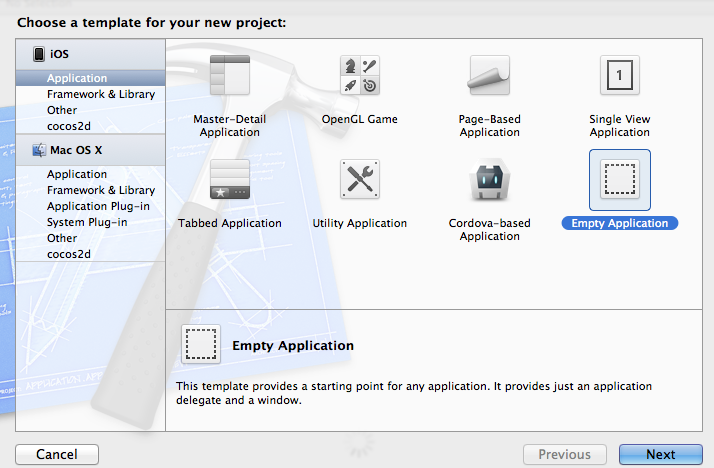
Xcode 에서 New Project를 선택하여 새로운 프로젝트를 만든다.
새로만든 프로젝트에서 New File을 선택하고 Objective-C class를 선택하여 SampleTableViewController라는 UITableViewController를 상속받아서 뷰 컨트롤러를 하나 추가한다.
프로젝트가 만들어지고 테이블뷰 컨트롤러를 만들고 난 다음에는 이 앱이 실행될때 SampleTableViewController가 보이도록 설정하자. AppDelegate.m 파일을 열어서 - (BOOL)application:(UIApplication *)application didFinishLaunchingWithOptions:(NSDictionary *)launchOptions 을 메소드 안에 다음과 같이 수정한다.
//
//  AppDelegate.m
//  SaltfactoryiOSTutorial
//
//  Created by Song SungKwang on 6/26/12.
//  Copyright (c) 2012 saltfactory@me.com. All rights reserved.
//

#import "AppDelegate.h"
#import "SampleTableViewController.h"
@implementation AppDelegate

@synthesize window = _window;
@synthesize managedObjectContext = __managedObjectContext;
@synthesize managedObjectModel = __managedObjectModel;
@synthesize persistentStoreCoordinator = __persistentStoreCoordinator;

- (BOOL)application:(UIApplication *)application didFinishLaunchingWithOptions:(NSDictionary *)launchOptions
{
    self.window = [[UIWindow alloc] initWithFrame:[[UIScreen mainScreen] bounds]];
    // Override point for customization after application launch.
    self.window.backgroundColor = [UIColor whiteColor];

    self.window.rootViewController = [[UINavigationController alloc] initWithRootViewController:[[SampleTableViewController alloc] initWithNibName:@"SampleTableViewController" bundle:nil]];

    [self.window makeKeyAndVisible];
    return YES;
}
빌드해서 실행하면 다음과 같이 비어 있는 UITableView를 가진 SampleTableViewController가 열리는 것을 확인할 수 있다.
우리는 비어있는 UITableView에 테스트하기 위한 dataSource를 만들것이다. SampleTableViewController.h 를 열어서 다음과 같이 테이블뷰에서 사용할 배열을 만든다.
//
//  SampleTableViewController.h
//  SaltfactoryiOSTutorial
//
//  Created by Song SungKwang on 6/26/12.
//  Copyright (c) 2012 saltfactory@me.com. All rights reserved.
//

#import <UIKit/UIKit.h>

@interface SampleTableViewController : UITableViewController
{
    NSMutableArray *items;
}
@end
그리고 SampleTableViewController.m 을 열어서 뷰가 로드될때 호출되는 - (void)viewDidLoad 메소드를 수정한다. 우선 SampleTableViewController의 타이틀을 지정하고, 오른쪽 상단에 편집할 수 있는 UIBarButtonItem을 추가한다. 그리고 그 편집 버튼이 눌러질 때 동작할 수 있는 IBAction을 추가하여 이벤트를 등록한다.
//
//  SampleTableViewController.m
//  SaltfactoryiOSTutorial
//
//  Created by Song SungKwang on 6/26/12.
//  Copyright (c) 2012 saltfactory@me.com. All rights reserved.
//

#import "SampleTableViewController.h"

@interface SampleTableViewController ()
- (IBAction)onEditButton:(id)sender;
@end

@implementation SampleTableViewController


#pragma mark - IBAction methods
- (IBAction)onEditButton:(id)sender
{
    //on edit button codes
}

- (id)initWithStyle:(UITableViewStyle)style
{
    self = [super initWithStyle:style];
    if (self) {
        // Custom initialization
    }
    return self;
}

- (void)viewDidLoad
{
    [super viewDidLoad];

    // Uncomment the following line to preserve selection between presentations.
    // self.clearsSelectionOnViewWillAppear = NO;

    // Uncomment the following line to display an Edit button in the navigation bar for this view controller.
    // self.navigationItem.rightBarButtonItem = self.editButtonItem;

    self.title = @"여러개의 행 수정 예제";
    self.navigationItem.rightBarButtonItem = [[UIBarButtonItem alloc] initWithBarButtonSystemItem:UIBarButtonSystemItemEdit target:self action:@selector(onEditButton:)];
}
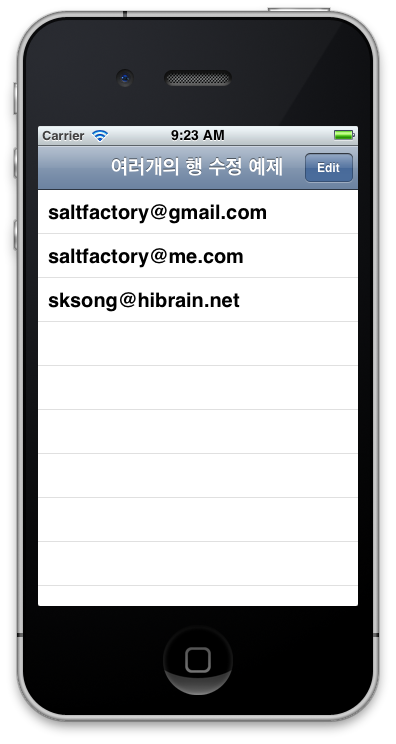
다시 빌드해서 실행하면 아래와 같이 “여러개의 행 수정 예제”라는 타이틀과 오른쪽에 Edit(편집)이라는 버튼이 추가된 것을 확인할 수 있다.
우리는 헤더파일에서 UITableView에서 사용할 dataSource를 items라고 추가 했었다. - (void)viewDidLoad 메소드 안에 dataSource를 설정하는 코드를 추가해보자.
- (void)viewDidLoad
{
    [super viewDidLoad];

    // Uncomment the following line to preserve selection between presentations.
    // self.clearsSelectionOnViewWillAppear = NO;

    // Uncomment the following line to display an Edit button in the navigation bar for this view controller.
    // self.navigationItem.rightBarButtonItem = self.editButtonItem;

    self.title = @"여러개의 행 수정 예제";
    self.navigationItem.rightBarButtonItem = [[UIBarButtonItem alloc] initWithBarButtonSystemItem:UIBarButtonSystemItemEdit target:self action:@selector(onEditButton:)];

    items = [NSMutableArray arrayWithObjects:@"saltfactory@gmail.com", @"saltfactory@me.com", @"sksong@hibrain.net", nil];

}
그리고 뷰가 로드될 때 UITableView를 구성하기 위해서 작업하는 UITableView의 delegate method를 수정한다. - (NSInteger)numberOfSectionsInTableView:(UITableView *)tableView 메소드는 UITableView의 section의 갯수를 반환하는 delegate method 이다. 우리는 단순하게 하나의 section만 필요하기 때문에 1로 고정했다. - (NSInteger)tableView:(UITableView *)tableView numberOfRowsInSection:(NSInteger)section 메소드는 section 안에 해당되는 row의 갯수를 반환하는 delegate method 이다. 우리는 items의 내용을 출력할 것이기 때문에 items 의 갯수를 반환한다.- (UITableViewCell *)tableView:(UITableView *)tableView cellForRowAtIndexPath:(NSIndexPath *)indexPath 는 UITableView에서 indexPath(section별 row)에 해당되는 UITableViewCell을 반환하는 delegate method 인데 여기서 UITableViewCell을 구성한다.
#pragma mark - Table view data source

- (NSInteger)numberOfSectionsInTableView:(UITableView *)tableView
{
//#warning Potentially incomplete method implementation.
    // Return the number of sections.
    return 1;
}

- (NSInteger)tableView:(UITableView *)tableView numberOfRowsInSection:(NSInteger)section
{
//#warning Incomplete method implementation.
    // Return the number of rows in the section.
    return items.count;
}

- (UITableViewCell *)tableView:(UITableView *)tableView cellForRowAtIndexPath:(NSIndexPath *)indexPath
{
    static NSString *CellIdentifier = @"Cell";
    UITableViewCell *cell = [tableView dequeueReusableCellWithIdentifier:CellIdentifier];

    // Configure the cell...
    if (cell == nil) {
        cell = [[UITableViewCell alloc] initWithStyle:UITableViewCellStyleDefault reuseIdentifier:CellIdentifier];
    }

    cell.textLabel.text = [items objectAtIndex:indexPath.row];

    return cell;
}
allowsMultipleSelectionDuringEditing
이제 빌드하고 다시 실행해보자.
우리가 원하는대로 items의 dataSource를 이용해서 UITableView에 items에 저장된 데이터들이 출력될 수 있게 되었다. 우리는 이제 이 UITableView를 수정할 것이다. Edit(편집)버튼을 누르면 UITableView는 여러개의 행을 선택할 수 있는 모드로 변경되길 원한다. 그래서 Edit(편집) 버튼을 눌렀을 때 연결되어 있는 IBAction 메소드인 -onEditButton: 을 수정하자. 그리고 오늘 이 포스팅의 핵심인 UITableView에 allowsMultipleSelectionDuringEditing 속성을 활성화하자.
- (void)viewDidLoad
{
    [super viewDidLoad];

    // Uncomment the following line to preserve selection between presentations.
    // self.clearsSelectionOnViewWillAppear = NO;

    // Uncomment the following line to display an Edit button in the navigation bar for this view controller.
    // self.navigationItem.rightBarButtonItem = self.editButtonItem;

    self.title = @"여러개의 행 수정 예제";
    self.navigationItem.rightBarButtonItem = [[UIBarButtonItem alloc] initWithBarButtonSystemItem:UIBarButtonSystemItemEdit target:self action:@selector(onEditButton:)];

    items = [NSMutableArray arrayWithObjects:@"saltfactory@gmail.com", @"saltfactory@me.com", @"sksong@hibrain.net", nil];

    self.tableView.allowsMultipleSelectionDuringEditing = YES;

}

#pragma mark - IBAction methods
- (IBAction)onEditButton:(id)sender
{
    //on edit button codes
    [self.tableView setEditing:YES animated:YES];
}
그리고 Edit(편집) 버튼을 누르면 그 버튼이 Cancel(취소)로 변경될 수 있게 하자. 다음 코드를 추가한다. 핵심은 self.tableView.allowMultipleSelectionDuringEditing을 활성화 했을 경우 self.tableView.editing이 활성화되면 여러개의 행을 선택할 수 있는 인터페이스가 만들어진다는 것이다.
@interface SampleTableViewController ()
- (IBAction)onEditButton:(id)sender;
- (IBAction)onCancelButton:(id)sender;
@end

@implementation SampleTableViewController

#pragma mark - IBAction methods
- (IBAction)onEditButton:(id)sender
{
    //on edit button codes
    [self.tableView setEditing:YES animated:YES];

    self.navigationItem.rightBarButtonItem = [[UIBarButtonItem alloc] initWithBarButtonSystemItem:UIBarButtonSystemItemCancel target:self action:@selector(onCancelButton:)];
}

- (IBAction)onCancelButton:(id)sender
{
    [self.tableView setEditing:NO animated:YES];

    self.navigationItem.rightBarButtonItem = [[UIBarButtonItem alloc] initWithBarButtonSystemItem:UIBarButtonSystemItemEdit target:self action:@selector(onEditButton:)];
}
빌드하고 실행한 다음 Edit(편집) 버튼을 눌러보자.
위와 같이 여러개의 행을 선택할 수 있게 되었고 Edit(편집) 버튼은 Cancel(취소) 버튼으로 변경되었다. 그리고 Cancel(취소) 버튼을 누르면 다시 원래 상태의 UITableView로 돌아가고 Edit(편집) 버튼으로 변경된다. 이제 UITableView가 수정모드로 되면 다른 액션을 취할 수 있는 버튼을 나타날 수 있게 하단에 UIToolbar를 만들어보자. Edit(편집) 버튼이 눌러지면 UITableView.editing 변경되게 하기 위해서 self.tableview의 -setEditing:animated를 사용했는데 에니메이션효과와 UIToolbar를 동시에 제어하기 위해서 -setEditing:animated: 메소드를 SampleTableViewController에 만들어서 두가지를 제어하게 하였다.
//
//  SampleTableViewController.h
//  SaltfactoryiOSTutorial
//
//  Created by Song SungKwang on 6/26/12.
//  Copyright (c) 2012 saltfactory@me.com. All rights reserved.
//

#import <UIKit/UIKit.h>

@interface SampleTableViewController : UITableViewController
{
    NSMutableArray *items;
    UIToolbar *toolbar;
}
@end
//
//  SampleTableViewController.m
//  SaltfactoryiOSTutorial
//
//  Created by Song SungKwang on 6/26/12.
//  Copyright (c) 2012 saltfactory@me.com. All rights reserved.
//

#import "SampleTableViewController.h"

@interface SampleTableViewController ()
- (IBAction)onEditButton:(id)sender;
- (IBAction)onCancelButton:(id)sender;
- (IBAction)onDeleteButton:(id)sender;
- (void)setEditing:(BOOL)editing animated:(BOOL)animated;
@end

@implementation SampleTableViewController

#pragma mark - IBAction methods
- (IBAction)onEditButton:(id)sender
{
    //on edit button codes
    [self setEditing:YES animated:YES];

    self.navigationItem.rightBarButtonItem = [[UIBarButtonItem alloc] initWithBarButtonSystemItem:UIBarButtonSystemItemCancel target:self action:@selector(onCancelButton:)];
}

- (IBAction)onCancelButton:(id)sender
{
    [self setEditing:NO animated:YES];

    self.navigationItem.rightBarButtonItem = [[UIBarButtonItem alloc] initWithBarButtonSystemItem:UIBarButtonSystemItemEdit target:self action:@selector(onEditButton:)];
}

- (IBAction)onDeleteButton:(id)sender
{

}

- (void)setEditing:(BOOL)editing animated:(BOOL)animated
{
    [self.tableView setEditing:editing animated:animated];

    if(editing){
        [self.tableView setEditing:YES animated:YES];

        toolbar = [[UIToolbar alloc] initWithFrame:CGRectMake(0, 480-44-44-20, 320, 44)];

        NSArray *buttonItems = [NSArray arrayWithObjects:
                                [[UIBarButtonItem alloc] initWithBarButtonSystemItem:UIBarButtonSystemItemFlexibleSpace target:nil action:nil],
                                [[UIBarButtonItem alloc] initWithBarButtonSystemItem:UIBarButtonSystemItemTrash target:self action:@selector(onDeleteButton:)],
                                nil];

        [toolbar setItems:buttonItems];
        [self.view addSubview:toolbar];

    }
    else {
        [toolbar removeFromSuperview];
        toolbar = nil;
    }
}
빌드해서 실행해보자. 이제 Edit(편집) 버튼을 누르면 하단에 Toolbar 가 보이게 되고 Cancel(취소)를 누르면 사라지게 된다.
마지막으로 휴지통을 누르면 선택한 row가 삭제되는 에니메이션을 만들기 위해서 -onDeleteButton: 메소드를 수정한다. UITableView에서 -indexPathsForSelectedRows 메소드를 이용해서 선택된 rows를 가져올 수 있게 된다. 그리고 dataSource에 removeObjectsAtIndexs로 해당 데이터를 삭제할 수 있고 -deleteRowsAtIndexPaths:withRowAnimation:을 이용하여 UITableView을 열을 에니메이션 효과를 주면서 삭제할 수 있게 된다.
- (IBAction)onDeleteButton:(id)sender
{
    NSArray *selectedRows = [[NSArray alloc] initWithArray: [self.tableView indexPathsForSelectedRows]];

    NSMutableIndexSet *indexSetToDelete = [[NSMutableIndexSet alloc] init];
    for (NSIndexPath *indexPath in selectedRows)
    {
        [indexSetToDelete addIndex:indexPath.row];
    }
    [items removeObjectsAtIndexes:indexSetToDelete];
    [self.tableView deleteRowsAtIndexPaths:selectedRows withRowAnimation:UITableViewRowAnimationAutomatic];
    [self.tableView reloadData];
}
빌드하고 run을 해보자 그리고 실행하면 이제 여러개의 열을 삭제할 수 있게 된다.
참고
- http://developer.apple.com/library/ios/#documentation/uikit/reference/UITableView_Class/Reference/Reference.html
- http://www.ioslearner.com/features-uitableview-ios-5/


