Mac App에 APNS(Apple Push Notification) 푸시 알림 서비스 사용하기
서론
애플은 OS X 라는 운영체제를 Mac 뿐만 아니라 iOS의 환경으로 만들고 Objective-C 단일 언어로 거의 유사한 SDK API 인터페이스를 제공하여 iOS 개발자와 Mac (Cocoa) 개발자의 경계선을 최소한으로 줄여주었다. 이러한 이유로 Mac (Cocoa) 개발자와 iOS 개발자는 특별한 어려움 없이 두가지 모두를 개발할 수 있다. 물론 디테일하고 다른 부분도 많지만 개발 접근 방식이 거의 유사하기 때문에 새로운 프레임워크를 익히기 위해서 많은 시간을 소비하지 않고 적응할 수 있을 것이라고 여겨진다. 오늘 이 포스팅에서도 이미 iOS에서도 APNS(Apple Push Notification Service)를 적용하여 개발해본 개발자나 연구원이라면 Mac (Cocoa)에서 APNS를 적용하는것이 iOS에서 적용하는 것과 비슷하다는 것을 느끼게 될 것이다.
우선 푸시 적용 테스트를 위해서 코코아 어플리케이션 프로젝트를 생성한다.
프로젝트를 빌드해서 실행해보면 윈도우 하나가 열리는 간단한 코드가 포함이 되어 있다. 우리는 iOS 개발할 때 APNS (Apple Push Notification Service)를 적용하기 위해서 개발자 사이트에 들어가서 다음과 같은 일련의 과정을 거쳐서 APNS 푸시 노티피케이션 서비스를 위한 프로비저닝과 라이센스를 획득했다. 다음 과정을 천천히 따라해보기로 한다.
개발자 라이센스
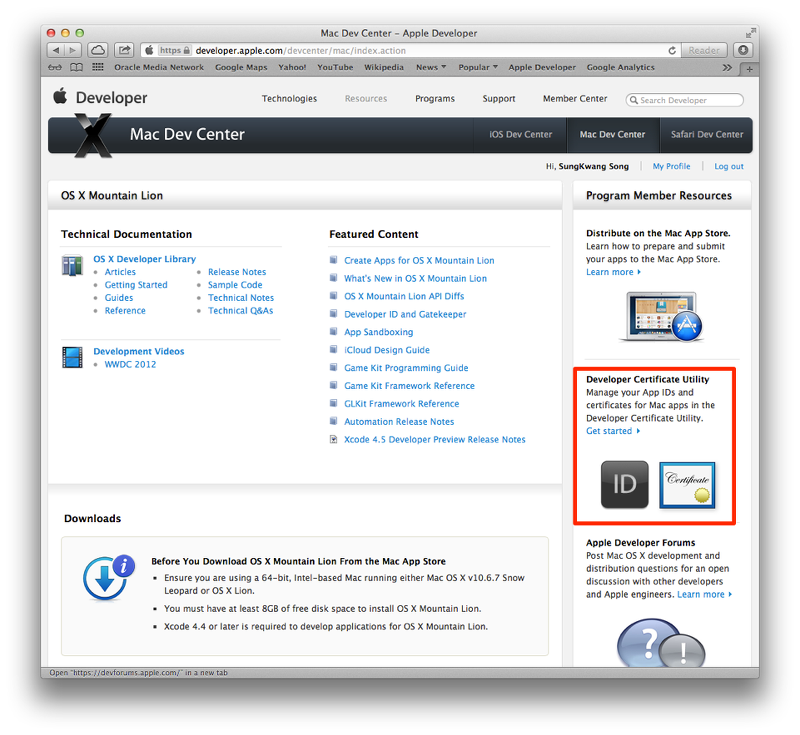
| 당연한 이야기이지만, 맥 개발하기 위해서는 아이폰 개발을 할 때와 마찬가지로 맥 개발자 라이센스가 필요하다. iOS, Mac, Safari 모두 각각 개발자 라이센스가 존재하며 모든 개발자 라이센스를 가지고 있으면 아래와 같이 iOS | Mac | Safari 의 Dev Centers 가 나타나게 된다. |
Developer Certificate Utility 접속
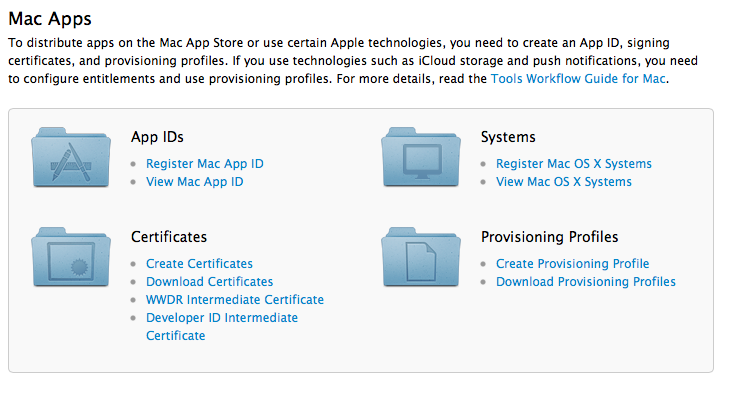
맥앱(Mac App)도 iOS App과 거의 동일한 방법으로 App ID를 지정하고 Certificates로 Provisioning Profiles을 만들고 해당하는 UUID를 등록해서 사용할 수 있는 System을 등록한다.
Create App ID
Create App ID를 클릭하면 Register Your Mac APP ID에 맥 앱의 이름과 설명 그리고 Bundle Indentifier를 설정하는 입력창이 나타난다. iOS에서 앱을 앱 스토어에 등록하기 위해서 App ID를 생성하는 화면과 동일하다고 입력하는 내용도 동일하다. 개인적으로 Mac 개발자 라이센스가 없기 때문에 연구소 이름으로 등록된 라이센스를 가지고 하나의 앱을 등록하고하는 샘플을 만들었다. Name or Description 에서는 앱을 식별하거나 구분할 수 있는 이름과 설명을 넣으면 되고, Bundle Identifier에는 앱의 유일한 ID를 지정하면 되는데 통상 도메인을 거꾸로하여 만들기고 묵시적으로 약속되고 있다. 주의할 점은 iOS에 등록한 Bundle Identifier와 동일하면 안된다는 것이다. 반드시 유일한 Identifier를 지정해야한다.
Apple Push Notification 설정
Mac App ID를 생성하고 나면 아래 그림과 같이 Mac OS X App IDs에 추가되어진다. 그리고 Development, Production 의 각각 Apple Push Notification 이 비활성화(Configurable for Service) 가 되어 있는 것을 확인할 수 있다. 이것은 iOS에서 App ID에서 APNS를 설정하는 것과 동일하다.
Configurate 버튼을 클릭하고 Mac OS X App 에 대한 설정을 시작한다. Configure App ID 옆에 Configure 버튼을 누르고 들어오면 App ID에 해당하는 앱의 설정을 할 수 있게 되는데 iCloude, Game Center, 그리고 App Push Notification service를 활성화시키고 설정할 수 있게 된다.
지금은 Enable for App Push Notification Service의 Generate 버튼이 비활성화 되어 있지만 Enable for Apple Push Notification service에 체크를 하면 generate 버튼이 활성화 되어진다.
Apple Push Notification service SSL Certificate 생성
Apple Push Notification service SSL Certificate Assistant를 이용해서 APNS의 certificate를 생성한다. 이 포스팅에서는 푸시 테스트하는 예제만 다루기 때문에 Development Push SSL Certificate만 generate 할 것인데, Mac App Store에 등록해서 서비스하기 위해서는 Production Push SSL Certificate를 생성해서 등록해야한다. Development Push SSL Certificate의 Generate 버튼을 클릭한다. 그러면 Apple Push Notification service SSL Certificate Assistant 가 나타나게 되고 Generate a Certificate Signing Request 화면이 나타난다. Apple Push Notification service SSL Certificate를 위해서는 맥 (Mac) 개발자 라이센스 Certificates가 필요하다.
Continue를 누르면 개발자 Certificates를 요구하는 화면이 나타난다.
이 화면은 그대로 두고 맥에서 Keychain Access 프로그램을 연다. 그리고 상단 메뉴에서 Certificate Assistant > Request a Certificate From a Certificate Authority… 메뉴를 선택한다.
그러면 Certificate Assistant 가 열리게 되는데 개발자 등록에 사용했던 메일주소와 이름을 입력한다. 그리고 Continue 버튼을 선택해서 저장하고 싶은 특정 위치를 지정하면 자동으로 CertificateSigningRequest.certSigningRequest 라는 파일이 생성한다
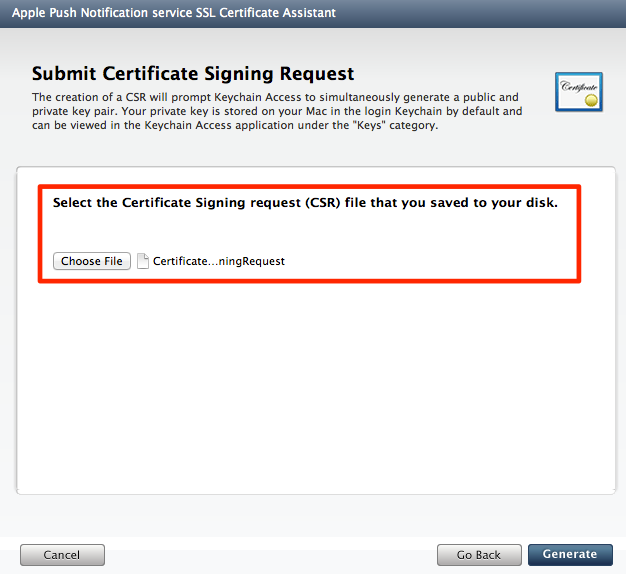
이렇게 만든 CertificateSinningRequest.certSigningRequest를 Apple Push Notification service SSL certificate assistant 에서 선택해서 애플로 submit을 진행한다.
마지막으로 Generate를 하면 다음과 같이 Certificates가 생성된 것을 알려준다
Continue 버튼을 누르면 Download & Installer Your Apple Push Notification service SSL Certificate 화면이 나타나는데 “DownLoad” 버튼을 눌러서 pas_development.p12을 다운받는다.
Apple Push Notification Certificate Keychain Access 등록
다운받은 aps_development.p12를 더블클릭해서 Keychain Access에 등록한다.
맥 (Mac OS X Systems)의 UUID를 systems에 추가
Systems 왼쪽 메뉴을 클릭하면 Mac OS X Systems ((MacBook, MacBook Pro, iMac, Mac mini, Mac Pro) 을 등록할 수 있는 화면이 나탄다. Register System 버튼을 클릭한다.
System Name or Description은 iOS 앱을 개발할 때 아이폰을 등록할 때 사용하던 방법과 동일하게 앱을 개발할때 사용할 Mac OS X System의 이름을 등록하고 Hardware UUID를 등록한다. 이 때 Hardware UUID는 다음과 같이 찾아낼 수 있다. 맥의 가장 상단의 사과 모양을 클릭해서 About This Mac을 선택한다.
그러면 Mac에 대한 간단한 정보가 보여주는 윈도우가 나타나는데 More Info… 버튼을 클릭한다.
그러면 좀더 자세한 맥의 정보를 볼 수 있게 된다. 여기서 System Report 버튼을 클릭한다.
시스템에 대한 정보를 볼수 있는 화면이 나타나는데 그 곳에 UUID를 복사해서 사용할 수 있다.
Provisioning Profiles 생성과 다운로드
마지막으로 Provisioning Profile 메뉴에 들어가서 Create Profile 버튼을 눌러서 새로운 프로비저닝 프로파일을 생성한다. 입력하는 항목은 다음과 같다.
- Kind: Development Provisioning Profile 과 Product Provisioning Profile 둘 중에 선택을 한다.
- Name : Provisioning Profile 이름을 지정한다.
- Mac App ID : Mac OS X App IDs에서 생성한 Bundle Identifier에 해당하는 이름을 가진 Mac App ID를 선택한다.
- Certificates : 맥 개발자 Certificates를 체크한다.
- Systems : 개발할 때 앱을 설치해서 테스트할 시스템을 선택한다.
그리고 Generate 버튼을 클릭해서 Provisioning Profile을 만든다. 잠시 기다리면 Mac Provisioning Profile Details 화면이 나타나고 하단에 Download 버튼이 활성화 되면 프로비져닝 프로파일을 다운로드 받아서 Xcode로 드래그해서 넣어준다.
이상없이 프로비저닝 프로파일이 생성되고 Xcode에 추가되면 Xcode의 Organizer-Devices에서 프로비저닝 프로파일이 추가된 것을 확인할 수 있다.
프로젝트의 Target의 Bundle Identifier 수정
이제 우리가 앞에서 추가한 프로젝트의 Bundle Identifier를 Mac OS X App IDs에 추가한 Bundle Identifier와 동일하게 한다.
Code Sign 수정
그리고 프로비저닝 파일을 사용할 수 있도록 Code Sign을 수정한다.
디바이스 토큰 획득
이제 Mac App에서 Apple Push Notification service를 사용할 준비를 모두 마쳤다. 지금부터는 앱이 실행할 때 APNS 서버로 전송할 Mac App이 설치되는 디바이스의 토큰을 획득해서 Push Provider(푸시 프로바이더)로 전송시켜줘야하는 프로그램을 코드를 추가해야한다. Xcode에 생성된 프로젝트의 파일 중에서 AppDelegate.m 파일을 열어서 다음 코드를 추가한다. iOS에서 App에 푸시서비스를 적용하기 위해서 -application:didRegisterForRemoteNotificationWithDeviceToken:을 사용했던 것과 동일하게 앱의 디바이스 토큰을 획득할 수 있다.
//
//  SFAppDelegate.m
//  SaltfactoryCocoaTutorial
//
//  Created by SungKwang Song on 8/14/12.
//  Copyright (c) 2012 saltfactory.net. All rights reserved.
//

#import "SFAppDelegate.h"

@implementation SFAppDelegate

@synthesize persistentStoreCoordinator = _persistentStoreCoordinator;
@synthesize managedObjectModel = _managedObjectModel;
@synthesize managedObjectContext = _managedObjectContext;

- (void)applicationDidFinishLaunching:(NSNotification *)aNotification
{
    // Insert code here to initialize your application
    // Register for push notifications.
    [NSApp registerForRemoteNotificationTypes:NSRemoteNotificationTypeBadge];

    [[NSApp dockTile] setBadgeLabel:nil];

}

- (void)application:(NSApplication *)application didRegisterForRemoteNotificationsWithDeviceToken:(NSData *)deviceToken
{
    NSLog(@"%@ with token = %@", NSStringFromSelector(_cmd), deviceToken);

    // Send the device token to the provider so it knows the app is ready to receive notifications.
    //    [self sendToProvider:deviceToken];
}


- (void)application:(NSApplication *)application didFailToRegisterForRemoteNotificationsWithError:(NSError *)error
{
    NSLog(@"%@ with error = %@", NSStringFromSelector(_cmd), error);
}
Xcode 에서 프로젝트를 빌드하고 실행시켜보자. 그러면 앱이 실행하면서 디바이스토큰을 획득했다는 정보를 콘솔로 출력시키는 것을 확인 할 수 있다.
이렇게 푸시를 전송시킬 디바이스토큰 정보를 Push Provider(푸시프로바이더)에게 전송시켜서 Push Provider가 APNS 서버로 푸시 전송을 요청하게 하면된다.
푸시 받았을 때 푸시 메세지 처리
이제 이 Mac App에 푸시가 도착했을 때 푸시를 처리하는 코드를 추가하자. -application:didReceiveRemoteNotification:은 APNS 서버로 부터 Push Notification가 전달되어지면 호출되어지는 delegate 메소드이다.
- (void)application:(NSApplication *)application didReceiveRemoteNotification:(NSDictionary *)userInfo
{
    NSLog(@"%@", NSStringFromSelector(_cmd));

    NSDictionary *apsDictionary = [userInfo valueForKey:@"aps"];

    // badge 설정
    id badge = [apsDictionary valueForKey:@"badge"];
    NSDockTile *dockTile = [NSApp dockTile];

    if (badge != nil) {
        NSString *label = [NSString stringWithFormat:@"%@", badge];
        [dockTile setBadgeLabel:label];
    }
    else {
        [dockTile setBadgeLabel:nil];
    }

    // alert 설정
    NSString *message = (NSString *)[apsDictionary valueForKey:(id)@"alert"];

    NSAlert *alert = [[NSAlert alloc] init];
    [alert addButtonWithTitle:@"OK"];
    [alert setMessageText:message];
    [alert setAlertStyle:NSInformationalAlertStyle];

    if ([alert runModal] == NSAlertFirstButtonReturn) {
        // Payload 설정
        NSString *messageFrom = [userInfo valueForKey:@"messageFrom"];
        NSLog(@"%@", messageFrom);
    }

}
푸시 프로바이더 생성 (Push Provider)
Xcode에서 빌드하고 앱을 실행시키고 난 뒤 실제로 푸시가 전송되고 받아지는지 테스트하기 위해서 간단하게 Push Provider 를 구축해서 테스트해보자.
Mac을 사용하는 개발자라면 MacPort난 Homebrew 같은 Unix missing package Tool을 사용할 것이다. Homebrew에 대한 설명은 Homebrew를 이용하여Mac OS X에서 Unix 패키지 사용하기 글을 참조하면 된다. 우리는 간단하게 Push Provider를 nodejs로 만들어 볼 것이다. 우선 Homebrew로 nodejs를 설치하자.
brew install nodejs
그리고 nodejs 모듈 중에서 apn(https://npmjs.org/package/apn)를 사용하기 위해서 npm 으로 모듈을 설치한다.
npm install apn
그리고 push_provider.js 파일을 생성하고 다음 코드를 추가한다.
var apns = require('apn');

var options = {
    cert: 'cert.pem',                 /* Certificate file path */
    certData: null,                   /* String or Buffer containing certificate data, if supplied uses this instead of cert file path */
    key:  'key.pem',                  /* Key file path */
    keyData: null,                    /* String or Buffer containing key data, as certData */
    passphrase: null,                 /* A passphrase for the Key file */
    ca: null,                         /* String or Buffer of CA data to use for the TLS connection */
    gateway: 'gateway.sandbox.push.apple.com',/* gateway address */
    port: 2195,                       /* gateway port */
    enhanced: true,                   /* enable enhanced format */
    errorCallback: undefined,         /* Callback when error occurs function(err,notification) */
    cacheLength: 100                  /* Number of notifications to cache for error purposes */
};

var apnsConnection = new apns.Connection(options);

var token="Mac App 에서 획득한 디바이스 토큰을 입력한다."
var myDevice = new apns.Device(token);

var note = new apns.Notification();

note.expiry = Math.floor(Date.now() / 1000) + 3600; // Expires 1 hour from now.
note.badge = 3;
// note.sound = "ping.aiff";
note.soude = "default";
note.alert = "Mac App Push Notification Tutorial";
note.payload = {'messageFrom': 'saltfactory'};
note.device = myDevice;

apnsConnection.sendNotification(note);
푸시 프로바이더 (Push Provider)는 Apple Push Notification Certificates가 필요하다. 그래서 Keychain Access 프로그램에서 Apple Push Notification Certification을 export 한다. export할 때 비밀번호를 요구하는데 이 비밀번호고 Certificates의 암호비밀번호가 될 것이기 때문에 기억하고 있어야한다.
그러면 Certificates.p12 라는 파일이 생성된다. nodejs의 apn 모듈은 이 apn_development.cer(이것은 애플 개발자 사이트에서 Mac OS X App ID에서 Apple Push Notification 설정을 enable로 변경하고 생성한 Certificate 파일이다.)에서 cert.pem과 Certificates.p12에서 key.pem 를 생성하여 사용할 것이다.
애플 개발자 사이트에서 Apple Push Notification의 enable을 설정하고 생성한 apn_development.cer 파일과 Certificates.p12를 push_provider.js와 동일한 경로로 복사한 이후 다음 명령어를 입력한다. key.pem을 생성할 때는 Keychain Access에서 export할 때 사용한 비밀번호를 요구하는데 비밀번호를 입력한다.
openssl x509 -in aps_development.cer -inform DER -outform PEM -out cert.pem
openssl pkcs12 -in Certificates_dev.p12 -out key.pem -nodes
위 명령어를 모두 마치면 push_provider.js와 동일한 경로에 cert.pem과 key.pem이 생성이 된다.
이제 push_provider.js를 이용해서 Mac App에 푸시를 발송해보자.
node push_provider.js
그리고 나면 맥의 Dock에 떠있는 아이콘에 뱃지가 3으로 표시되고 Alert 창이 뜨면서 아이콘이 둥둥~ 거리게 된다.
그리고 OK 버튼을 누르면 palyload로 추가한 메세지를 콘솔로 출력하게 된다.
결론
OS X 기반의 Apple Push Notification Service의 적용 방법은 iOS나 Mac App (Cocoa)와 거의 유사한 방법으로 적용하여 사용할 수 있다. 두가지 앱 개발 모두 UUID와 Provisioning Profile을 사용하며 APNS Certificates를 생성하여 Push Provider를 이용해서 Apple Push Notification service를 사용하기 때문에 등록 절차부터 -application:didRegisterForRemoteNotificationWithDeviceToken: 까지 동일하게 적용이 된다. 이제 Mac App에서 더이상 데이터를 가져오기 위해서 폴링 방법을 사용하지 않고 Push Provider를 설치해서 데이터를 푸시로 밀어 넣어주는 앱을 만들 수 있을 거라 기대된다. 이 포스팅에 앞서 NSUserNotification과 NSUserNotificationCenter 에 대한 연구 글도 참조하면 Mountain Lion에서 사용하고 적용중이 여러가지 Push Notification을 제공하는 앱과 동일하게 사용할 수 있을 거다 예상된다.
소스
- https://github.com/saltfactory/Saltfactory_Cocoa_Tutorial/tree/t2-Cocoa_Push_Notification
참고
- https://developer.apple.com/appstore/push-notifications/index.html
- https://github.com/argon/node-apn


